Sunday, January 30, 2011

Assignment 2: First Photographs

We are currently experiencing very grey dull weather, the snow on the ground matching the heavy white overcast skies.  This is means very limited contrast and almost all photographs I take look black and white unless I very specifically incorporate colour.  Not the ideal conditions for this assignment, with strong sunshine, I can manage the contrast by shot selection, in these conditions I have limited choice.  On the other hand it provides a good chance to work up some ideas and create some low contrast images.

Yesterday I took a walk around my usual photographic circuit, offering a mix of city park, allotments, tower blocks, and ultra modern office buildings - frankly I could shoot the whole course in this neighborhood.  This is actually a serious thought at present, as that would bring me closer to my immediate world and provide a good run up to the Landscape course, I am just not sure if I can sustain enthusiasm for the next 6 months or so that it will take.  In any case my exploration yielded 3 possible concepts for this assignment; 1. Environmental Details, 2. Interaction of trees and buildings, 3. Building Geometries:

1. Environmental Details

Not a complex subject or a particularly inventive one, just hard to do well and produce a coherent set of images.   The challenge would be to try and find a set of images that combine to tell a story or at least describe something - otherwise I end up with a load of clever but banal images.  Here are 5 images from yesterday that would fit this brief:


Of these the final two are the most rewarding.  The rope tying the vine together looks normal enough, but the contrasting yellow stripes of the background ask a question of where this can be.  It is a continuation of the second images 3 yellow stripes around the base of what was once a post office - yellow being the company colour of Deutsche Post.  The final image is part of the emergency exit system from a major highway that runs underground through the local streets.  This was buried a few years ago and the signs of it are now hard to find.

2. Interaction of trees and buildings


OK, not many buildings, other than the occasional shed, however, I like this one, very bleak and wintery.  This is a telephoto compression of the local allotments.


More in keeping with my idea of juxtaposing trees with buildings, however, this is too simple a shot, although satisfying in its own right.


More that I have in mind, however, it is the next 2 images that interest me


One thought I have for this assignment is to show trees obliquely, as reflections or shadows on buildings.  The idea would be to photograph the buildings with the trees almost acting as ghosts of the landscape that was destroyed to construct the glass and concrete cities.


Another approach would be simply one of juxtaposition, showing trees and buildings in interesting compositions, a little boring maybe, unless done extremely well

3. Building Geometries

My final current idea, is the one I started the process with and that is to look for unusual and interesting geometrical shapes created by photographing very narrow frames of modern architecture.


This crane featured in my first assignment, oddly I have gone from detesting the things and their impact on the skyline to really appreciating their structure and strange almost alien presence in the city.  They appear to stalk across the city like the Martian walkers in the War of the Worlds.


One detail would be created by repeating forms, especially where the form is continued in reflection.  The next 4 images are all details of the Hypohaus, a building that provides an endless supply of photographs.


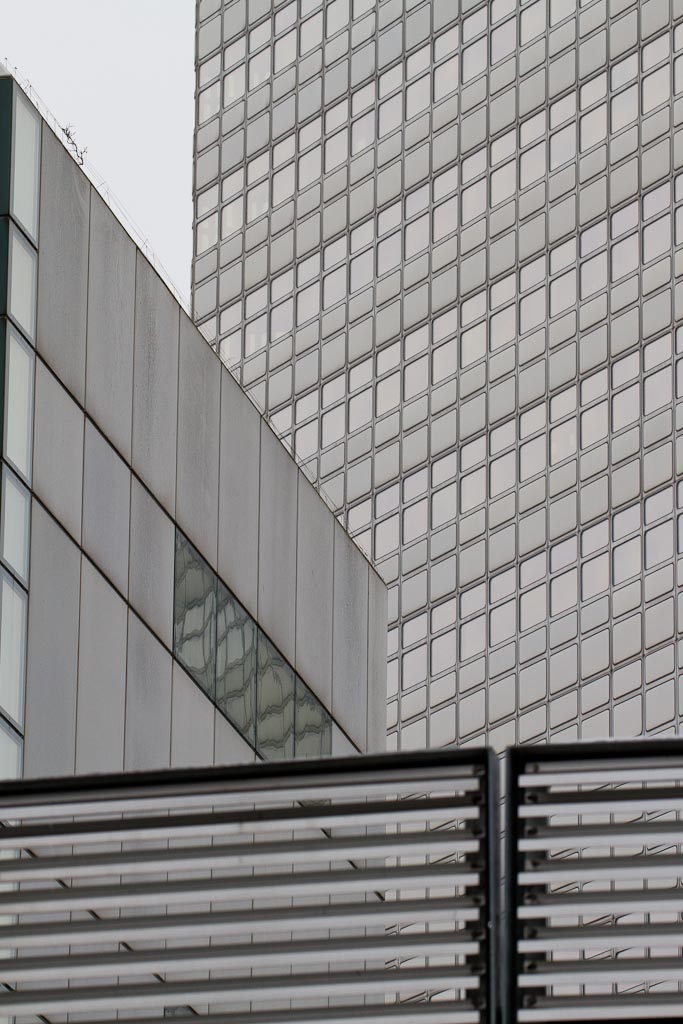
This building could provide all of the photos I need for this assignment, but that might be a little too easy.  However, I have time and perhaps a way to complete this will be to run at it from multiple themes, developing each in parallel and then see which one works best at the end.

All I need now is a little Sun and I can go do some high contrast shots!

Saturday, January 29, 2011

Assignment 2: First Thoughts

having just received my feedback from my tutor for Assignment 5 of PaP I am now free to focus my attention on DPP and turn my full attention to assignment 2.   There is a significant difference between DPP and PaP that progressively becomes more apparent as I work through the course.  PaP was subject focused, whilst DPP is technique/method focused.  Essentially; PaP was quite prescriptive about the subject but left the treatment open to the student, conversely DPP is totally open about the subject but very directional in how it should be shot.

The practical outcome is that I now need to work up a subject or subjects that enable a series of 6 photographs with the following properties:

  • A High Dynamic Range (high contrast)
  • A Low Dynamic Range
  • Low Light, requiring high ISO
  • Mixed Lighting
Ironically my photos for Assignment 1 fit this brief quite well, the only exception being lack of a high-ISO image, however, that could have been added easily enough shooting at twilight.

When I started this course I was in a serious quandary not about the choice of this course, but where my photography was leading, and which of the Level 2 courses I was headed towards.  Part of the reason for doing this course was to build skills for the latter courses (naturally), but also to potentially omit the advanced digital photography course in favor of the 2 subject orientated courses.  If I had dropped this course I would have been driven towards doing the advanced digital course.

Throughout the course so far my interested has been in the city, it's landscape and inhabitants, influenced in equal measure by the modernist approach to architecture driven imagery and the post-modernist ethos of street photography. I see Social Documentary and Landscape photography coming together in the photographic study of a modern city, the delineation formed by subject emphasis and perhaps scale.  More or less people, tight versus broad framing.  I believe there is a continuum of subject and treatment.

This leads to my subject choice here, a key motivation in starting this course was to use the assignments to experiment with concepts of landscape photography in a city environment, concrete, glass, and steel, rather than rock, water, and vegetation.  At this point I could easily turn my attention to my other photographic joy (well one of them at least), still life studio work.  A detailed study of plants or technical objects under varying lighting conditions would work very well for this assignment and would be an easy choice, given that right now it is minus five outside.

However, I plan to stick to my goal and maintain the city as my subject, this will also work well into the Black and White work of assignment 3, although I am less sure about the "real or fake" elements of Assignment 4, although Assignment 5 should be no issue and able to complete in warm spring sunshine (nice thought right now).  The greatest risk in this approach is that I am not showing much variety of subject, however, a key part of this course is to develop artistic voice and currently my infant ramblings speak the language of the city.

Having completed Assignment 1 with a wide vista architectural study of local buildings using only a 24mm tilt shift lens, I now want to turn my attention to details of the city, looking for interesting or unusual compositions formed out of the juxtaposition of different elements of street or building architecture.  I am not sure at the moment where this will take me, although one thing I do understand and that is that the 24mm lens will be of no value whatsoever for this task.  I will turn now to longer focal lengths, either 200/300mm primes, or take advantage of the versatility of my new 70-300mm IS zoom.  The approach I have in mind is more likely to require a hand held camera than tripod mounted, so image stabilization will be essential. The key constraint will still be perspective management, so finding a position that allows shooting from a distance is likely to work best.  I also plan to use my 7D APS-C body for this, rather then the full frame 5D2, the added "magnification" of the smaller sensor might help with framing.

My first task is to head out the door and take a bunch of frames and see how I like the look of the images, at first locally, although I can already think of other sites in the city that will yield interesting subject matter for this exercise.  


Thursday, January 27, 2011

Ex. 10 Colour cast and white balance

White Balance, the bane of my photographic life!  Prior to enrolling with the OCA, about 80% of the photographs I took were whilst scuba diving.  Very early on in attempting to take photographs at any depth greater than a few meters it becomes very clear that light behaves quite differently under water.  Red light can only penetrate around 10M of water, all other colours having varying absorption profiles with Blue having the least attenuation.  This is essentially why photographs taken underwater have a strong blue caste.  I have been shooting underwater for several years and know how to work around this problem, but this really trips up the beginner with a point and shoot in a plastic casing that goes to 40M.  Part of the problem is that our eyes white balance for us as we go deeper, however, the camera cannot be programmed to understand this, it still thinks it is above water.  They look at my colorful pictures and wonder what on earth I did.

Well the answer is not so easy - I have two 160J strobes attached to my camera, even then I can only get good colour if the subject is no more than 1 or 2 meters away (the path length of the light from the strobe to the subject and then back again is subject to the same absorption issues as sun light). Even then I have to mix strobe with ambient light.  The next requirement is to only shoot RAW and if possible shoot subjects that have an element of white or grey in them, or periodically shoot a white card.  In all cases WB must be adjusted after shooting.  It is possible to avoid use of strobes via red filters that attempt to rebalance the colour in the frame, a great technique for large objects such as wrecks or schooling fish.  However, there is a loss of at least two stops in light which results in a need to increase ISO and hence an increase in noise.  I suspect the current generation of FF DSLR's will manage this quite well with high ISO, but my old Canon EOS 40D struggled.

To illustrate this issue, this is a very early shot of me taken with a 2 megapixel at about 20M.  All red light is gone, the only colours left are essentially blues and greens:


Even with a DSLR and external strobes, the same basic issue remains.  Each of the following pairs of images shows the shot as it came from the camera and then the image processed through Lightroom.  I have made a number of changes, however, note how the colour cast has been removed in each case by using the WB eye dropper tool.  Turtles and Sharks are good subjects for this as they have large patches of near white or grey from which to establish a good reference point.


Without shooting RAW none of this would be possible.  Fortunately in the tropical ocean, white is usually available as there is frequently coral sand somewhere in the frame - these shots into the blue are the hardest to get right.

So it is with some experience of this issue that I turn to Exercise 10.  Currently much of my photography revolves around my local landmarks and landscape, my favorite target being the Hypohaus.  These photographs were taken on a wintry day with low sunlight illuminating the scene of the upper row of images from the left.  The bottom row of images is the frontage of a block of rather dilapidated flats.

In both cases I have used a sequence of WB: (left to right) Auto, Sunlight, Shade, Cloudy.  In both cases the Canon 5D2's Auto function has done a pretty good job and on the whole this is where I leave it for most shooting. The auto mode images are almost identical to the appropriate WB image in both cases. Clearly the Shade setting is warming up the image, suggesting a higher colour temperature for the shady areas.  The cloudy setting is slightly cooler in both cases. In all of the images here setting WB in post processing with the eye dropper tool would be very straightforward.

For the cloudy day shots I have completed 3 extra shots for fun:


The top row has the same sequencing as before, however, I have added 3 extra settings to the lower row (again left to right): Tungsten, Fluorescent and Flash.  Once more the auto shot best resembles the manually selected Cloudy setting.  In this case the difference between the shots is less pronounced.  The "artifical" lighting settings, as expected, introduce strong colour casts, with the exception of Flash.  I had not thought about this prior to shooting these frames, but it really makes sense.  The colour of light in a flash gun must be balanced to daylight, otherwise the use of fill flash would not be possible - the principal use for on camera flash photography.

Moving indoors I set my camera on a tripod poiting out of the window of my home office/studio/digital darkroom, know locally as the shed (independent of the fact it is actually a first floor bedroom - it functions as my shed).  This is one of the few rooms that still has good old fashioned Tungsten bulbs (these exercises get harder!), as I need to be able to flick a switch and generate instant lighting when working in near darkness on a still life for example.  By framing both walls and some silvered devices (my printer and scanner) in the same frame as the outside world I was able to combine natural and external lighting.  I waited until the two were in balance and shot 9 frames.  Again reading left to right from top to bottom: Auto, Sunny, Shade, Cloudy, Tungsten, Fluorescent, Flash - then grey card and manual white balance.


The mixed lighting conditions have definitely confused my camera and forced a compromise that leaves the interior slightly yellow and the exterior pale blue.  The daylight settings render the outside correctly, especially the cloudy setting, but in all cases the room is almost orange.  On the other hand the Tungsten gets the room almost right, but at the expense of a very blue outdoors.  By shooting a grey card and using that as a WB setting I achieved a final shot using a manual white balance.  In this case the walls and silver elements of the printer have no perceptible colour caste, however, the world outside is now quite blue.  This is an extreme example, combining strong interior light with weak external, there simply is no WB setting that will handle both.  I would accept a slightly yellow interior as we know that lights are yellow, however the only way to balance this scene would be a composite of two images, although the blinds would make this a tedious task.

White Balance is a key element in creating a successful digital photograph, as important as ISO, shutter speed, etc.  However, with a well calibrated camera and appropriate tools this can be a post shooting activity.  I do, however, keep a grey card in my bag just in case.  I also use a colour target to calibrate my camera when I really must get it right!

Wednesday, January 26, 2011

Assignment 1: Tutor Response

Although not the most demanding assignment, I was really please to get the one word sentance "Brilliant!!" in the email accompanying the written feedback.  So far so good!

On the subject of workflow, the only comment was that I should reformat my cards after backup - a good point and something I often forget to do, and often only realize after taking a bunch more photographs using the old card.  My saving grace is the combination of the Lightroom being intelligent enough to only upload new images from a card and the fact that memory cards are so cheap now, space is not really an issue.  My camera strap has 2 x 8GB permanently enclosed in a pocket to act as spares.  I now have over 10 8GB cards, enough to use a new card every day when on an extended diving trip - this acts as an effective backup in case of hard drive failure on my laptop.

Regarding the individual images:

DPP1-1 Suggestion to crop some of the weeds off the bottom of the frame:

Original


Updated
I have slightly changed the aspect ratio from 3x2 to A4 in doing the crop, something I will need to do to all images prior to printing.  Reducing the weeds meant that I needed to reduce the inclusion of the left hand tower block - not sure about that.  A more Panoramic crop might work better:


 Not sure about this, it was the juxtaposition of the unruly foreground with the clean buildings in the background that originally brought my attention to this subject.

DPP1-3:  Crop the image so that the tower moves further to the right of the image:

Original

Update

This does look better, however, there is only a little I can do without losing the reflections in the steel at the bottom of the frame.  Again I have not much altered the aspect ratio of the image.  This might work better as a square crop.


Much better!

DPP1-5: The suggestion here was to clone out the lamp on the far right - not sure about that?

Cropped

I think a slightly tighter crop manages the job - I am very unsure about using clone tools to tidy up images, beyond removing dust spots or optical artifacts.

DPP1-7: Reduce the glare from the panel in the bottom right

Original

Adjusted

This is a rather crude reduction in exposure made in Lightroom, but it does aide the composition and removed a distracting element from the frame.  I could have used a crop, however, I like the crane in the bottom right of the frame.

DPP1-8: Here the suggestion was to clone out the crane.  This is the only case where I really disagree, for me the crane is a key element of the composition, one reason why I created this image.  Furthermore removing it would be a singificant challenge as it occupies a large part of the image and is behind starbursts.


Overall very good suggestions and I realize I have much to do when it comes to balancing compositions.  This feedback also raises two major questions in my mind, that of major modification and of aspect ratios in images.  

Monday, January 24, 2011

New Technology

As this course has a stronger emphasis on the technology and process of photography than the more art based courses, I intend to spend some time in my blog discussing my technical development and devices that I have added to my photographic arsenal.  In some of my earlier posts I have detailed my Digital Darkroom setup, over Christmas I have added a device that slightly alters my existing workflow and another that will evolve a brand new workflow

The first is the rather awkwardly named LaCie 4big Quadra 4TB RAID-System.  This is an external disk array containing 4 x 1TB drives organized into a RAID5 array.  What this essentially does is to stripe data across all 4 disks in such a way that if one disk fails the data is not lost.  What I end up with is a single 3TB volume.  The advantage of such a device is that I no longer need to manually maintain a dual disk backup.  This does not remove the need for occasional copy and removal of data to another location (fire will kill the drives), however, it should mean that there is little or no risk of data loss due to hardware failure.  This is quite a bit more expensive than buying separate disks, however, the convenience of the box coupled with the security was worth the 500 Euro investment.  It is also quite a bit faster than single external USB drives, especially when reading, which is 90% of what I do.  Not a cheap option, but when I think back to the mid-90's when I was a pre-sales computer engineer working for Compaq, a 7 drive array with 7 x 4GB drives, providing 24GB of total storage was over $50,000, this is quite amazing value.  The device also detects the presence of the computer starting up and shutting down automatically. It is also quite odd looking:


The other device that has found its way into my home is an Epson V700 Photo Scanner.  My mother recently moved from a large family home into a comfortable but small apartment, resulting in much sorting of old stuff.  Whilst helping her with this we went through some of the old family photos, currently stored in boxes and not labeled in any meaningful way.  I quickly realized that the only person now alive who could say who these people were or when the images were taken was Mum.  I now have the photos and am committed to scanning them and creating a series of books that document our early family history.  I realize the unique value of these "documents" to the future generations of my family, however, without context they are simply old black and white photographs  of no interest.  With context they become small parcels of family history.  I recently read that a key result of photography was that around 100 years ago ordinary people were starting to see pictures of their forebears for the first time - this only became possible with the development of affordable photography.  My brother has two sons who one day might look back and wonder where they came from - the books I plan to create will answer some of those questions.

The scanner also has the ability to handle pretty much any film format, a useful tool if I ever go down the medium format or view camera route.  However, it is the ability of such a device to capture old images and enable them through the medium of digital book publishing to gain new currency and import, even if only to a small number of people, but people I deeply care for.

Sunday, January 23, 2011

Ex. 9 Scene dynamic range

For this exercise I had another Christmas present, this time one that I bought myself, a 16-35mm f/2.8 wide angle zoom.  This is a lens that has been at the top of my "want" list, but not on my "need" list, as I have another lens with a similar range, but not f/2.8.  This years Christmas bonus was better than expected and so I had the chance to add this to my collection.  I plan to use this lens for street and indoors work, I think it will make an excellent documentary lens.  I am also considering a second present, a 35mm f/1.4 prime, expensive, but possibly the ultimate low light street photography lens.  As a result I have completed this exercise shooting all images at 35mm to get a sense of the framing and whether it would work for me.  My conclusion, 35mm is wide enough to grab a sense of space and tight enough to draw attention to the subject, very nice framing - so time to think whether to invest or not.  I have never regretted buying a fast prime, and looking at the second hand market it is not a great investment, but also not money burned.

Back to the exercise.  In exercise 8, I was able to estimate that my 5D2 has a dynamic range of approximately 9 stops.  This exercise turns the table around and looks at the dynamic range of scenes rather than the camera.  Today was a good day for this activity, a cold, but sunny January Sunday.  I am continuing to focus on the city and my immediate surroundings for this course, so took a walk around my local park and a few office buildings nearby, the same ones I used for my Assignment 1 images.

All of the following photographs were taken at 1/125s and 35mm - I allowed the aperture to float.  This allowed me to measure the relative brightness of each scene using the cameras in built matrix metering.  After each photograph I then used a hand held light meter to spot meter the scene looking for the brightest and darkest areas in the frame.  I set the meter to give me an eV reading for an exposure time of 1/125s and ISO 100.  For this exercise that was a simpler process as it would allow me to directly calculate the exposure range of a scene. Conversion back to f-stops can be easily achieved using an exposure table that maps eVs to f/stops and shutter speed:

http://en.wikipedia.org/wiki/Exposure_value

f/9.5

This was the first scene I found that had a good range of brightly lit and shaded areas.  The darkest zone is inside the gas station and read at 11.8eV, whilst the brightest was the office tower in the background reading at 16.3eV - so a dynamic range of 5.5 stops.  This rather surprised me as it was much less than I expected for this scene.  As a matter of interest the f-stop equivalent is roughly: f/5.6 to f/22 - the camera metered f/9.5!

f/6.7 

This is a brutal image and one taken deliberately to stress the camera and find a high range.  The white background contains the direct sun, but is completely blown out all across the range.  The exposure range is 9.9 to 22.7eV, a dynamic range of 12.8 stops (I think the 22.7 is too low as I could not use the meter properly due to the glare).  The camera has no chance of creating an acceptable image in these conditions, the range of the scene far exceeds the range of the camera.

f/4.5

This time I looked for a flat image with a minimal range, 10.3eV reading from the shaded tree bark to 14.8 in the sky - a range of 4.5 stops.

 f/6.7

Here I have looked for an even lower range scene, very deliberately avoiding inclusion of the sky.  The range is 10.2 to 13.6eV, 3.4 stops. However, still an interesting image!

 f/8

A more pastoral scene offering up a range of 10.2 to 15.4eV - 5.2 stops.

f/11

This was an attempt to find a higher range scene, including the glass frontage and its reflection of the sky.  I was surprised to find that this scene was actually quite low from 11.4 to 15.9eV, or 4.5 stops.

 f/13

Turning the corner I finally managed to find some good contrast, this time a building strongly reflecting the sunshine, but not containing a direct reflection of the sun.  This time the range was 12.9 to 19eV, or 6.1 stops.

f/13

Moving along a little I recomposed to include the suns reflection and found a much higher range, from 13.5 to 22eV - 8.5 stops.

This was more than the 5 images requested, I found this a very interesting exercise and wanted to explore a little more. What surprised me was that many scenes that looked to me to be high contrast had a much smaller range than I had expected.  The cameras 9 stop range would theoretically handle any of the scenes that excluded the direct Sun, although that could only happen if I judged the lowest and highest exposure values correctly and then placed the camera at the center of that range.

The lesson learned is that any highlight clipping or loss of shadow detail is down to my poor exposure management, not the camera!

Reading and Back to the Course

Somehow this years Christmas holidays completed defeated my desire to take photographs, today is the first day I have even had camera in hand since the 17th December, however, it was good to get out again and think about a few shots for the final two exercises prior to having a go at Assignment 2. Prior to Christmas I was energetically pursuing assignments for both People and Place and Digital Photographic Practice; in November I managed 24 Blog entries across both courses.  I guess this simply exhausted my creativity and enthusiasm.  Then adding the preparation for the holidays and spending the first two weeks of the New Year in an IKEA fueled furniture marathon left no time for much else.

The lesson learned is to pace myself a little more and not get too worried if progress slows down.  A 5 week break from the course enabled me to refresh my batteries a little.  Doing a Degree course in conjunction with a 50 hour a week career should be tough.  When I did my first degree, requiring no more than 30 hours study a week, I had two 1 month and a 3 month break every year. SO time to stop bashing myself for taking a break.

So what has happened recently course wise.  I finished reading the "Genius of Photography" by Gerry Badger just before the holidays, what an excellent book, the best general overview of photography I have yet to read - entertaining and informing.

The Genius of Photography

Beyond those comments (no more review), what did I learn from this book?  Actually, not a great deal that I did not otherwise learn from other histories of photography, however, each different volume layers up an understanding of this artform and introduces a few new artists together with a deeper understanding of the major movements.

The biggest learning point was to finally get a grip on modernism and post-modernism, or at least I thought so at the time!  Modernism appears to be the embrace of new technologies, a newer cleaner design and architectural style, a good example of which would be the Bauhaus movement in 1920's Germany.  Post modernism rejected elements of this style and introduced the concept of cross media art, sculptures including photographs, video installations.  The post-modern is dirtier, dynamic rather than static, less formal, however, I am yet to come to a meaningful understanding that I can write down. I will return to this subject - I thought I had it, now as I write I realize I don't.

Currently I have stepped away from photography in my reading (I even read a novel over the holidays!), and am currently tackling a very introductory text on the history of art, "The Story of Art" by E.H. Gombrich.  Am only up to around page 65, but the easy reading nature of the book and the great story it tells are pulling me on.

This book was one of several that came my way as Christmas presents, my Amazon wish list was carefully selected this year.  Among them are a couple of gems, "The Photobook", volumes 1 and 2 by Martin Parr and Gerry Badger.  What a gift! Fascinating to dip into and look at how the style of photo presentation has developed over the last 150 years or so.  I very much like to produce my own photobooks and so far have created several using the Blurb book publishing platform.  As a final destination for my work I see the photobook as a better medium than the gallery print - presenting my work as an essay rather than an individual statement works with my current outlook.  Thus far the books I have created are either wedding or holiday albums, carefully prepared, but not exactly art.  A personal goal over the next few years will be to slowly build a body of work reflecting the city of Munich as I see it and put this together as a photo essay.

That's it for now - back to working on exercises!