The recurring theme in much of what I am reading about photography concerns the concept of "truth" and the acceptance that there is no such thing as photographic truth. Even in the absence of Photoshop, photographs may be staged and submitted as evidence of activity that has not taken place. I have done a fair bit of traveling recently, last weekend was a trip home to the UK to visit my family prior to Christmas. On the return flight I picked up a copy of The Independent and found the following article
http://www.independent.co.uk/news/world/asia/52bn-of-american-aid-and-still-afghans-are-dying-of-starvation-2158667.html
Huge amounts of aid money is flowing from the west into Afghanistan and yet the population continue to starve. Within the article was a short piece that mentioned that a great part of the problem is that aid is being appropriated by warlords and local con men. A case in point was funding for a tractor repair factory in a part of the country deemed to dangerous for foreign visitors. The recipient of the aid simply rented a few tractors, a small workshop and hired a few people to look busy. This was all photographed and the subsequent pictures sent to the Washington agency responsible for the funding. They were happy that all was going according to plan. Amazing - even in the age of digital manipulation, such simple subterfuge is believed without question. Even Daguerre could have pulled this one off.
Monday, December 20, 2010
Friday, December 3, 2010
Photoshop
I recently was asked to work an event as a photographer. The event was an evening party between HP (my employer) and the German software company SAP. I have discussed this in the "People and Place" blog:
http://sclarke-people-and-place.blogspot.com/2010/12/photo-shoot-works-party.html
However there was one activity as a result of the party that is very relevant to Digital Photographic Practice and that stemmed from the following photograph:

A fairly innocuous image (totally uncorrected) of the team that looks after the HP SAP relationship in Germany. The reason they asked me to take it was that they needed a team photo for an upcoming newsletter and they wanted all 7 team members in a photo. 7? Well this began the challenge, they forgot one of the team and by the time they realized that, he had left the party and headed to his hotel. A quick look through the photos I had taken so far threw up the following image, he is the guy on the left.

So the request, well you must be good at photoshop???? Hmm, I have never attempted such a thing, never been really interested in manipulating photographs to the extent of adding or removing people. Well time to learn. Luckily the two photographs were fairly similar in tonal properties and the background was unfussy in both.

What I find scary about this, is that with very little knowledge of Photoshop I have been able to include a person in a photograph they were not present for and produce an image that fooled a couple of people that I showed it to. What can an expert do? And what does this mean for the veracity of photography - well the answer to that is clear, digital photography has no veracity.
http://sclarke-people-and-place.blogspot.com/2010/12/photo-shoot-works-party.html
However there was one activity as a result of the party that is very relevant to Digital Photographic Practice and that stemmed from the following photograph:

A fairly innocuous image (totally uncorrected) of the team that looks after the HP SAP relationship in Germany. The reason they asked me to take it was that they needed a team photo for an upcoming newsletter and they wanted all 7 team members in a photo. 7? Well this began the challenge, they forgot one of the team and by the time they realized that, he had left the party and headed to his hotel. A quick look through the photos I had taken so far threw up the following image, he is the guy on the left.

So the request, well you must be good at photoshop???? Hmm, I have never attempted such a thing, never been really interested in manipulating photographs to the extent of adding or removing people. Well time to learn. Luckily the two photographs were fairly similar in tonal properties and the background was unfussy in both.
- I started by removing the missing guy from the second photograph by cutting away everything in the photo but him, setting the background to transparent.
- I then did the same to the left side of the group photo, from the strong black line to the left.
- I extended the canvas of the group photo.
- To this I added a rectangular panel which I had shaded to the same tone as the wall on the right of the image, using a gradient fill.
- All that was then required was to drop the missing guy into the group image. I adjusted his size and height in the image, based upon what I could recall of his stature.
He looks as if he is not terribly interested in the group photo and I do not think it is a very convincing image, but better than nothing and an interesting exercise.

What I find scary about this, is that with very little knowledge of Photoshop I have been able to include a person in a photograph they were not present for and produce an image that fooled a couple of people that I showed it to. What can an expert do? And what does this mean for the veracity of photography - well the answer to that is clear, digital photography has no veracity.
Tuesday, November 30, 2010
Ex. 8 Camera Dynamic Range
This was interesting, many challenges and some useful learning. The first trick was to understand exactly what the exercise wanted, took a couple of reads to understand the goal fully. The next challenge was going to be the weather, however, for a change I had a stroke of luck. Two days ago we had 10cm of snow and then this morning the sun came out. Ideal conditions for this exercise, the snow is about the most reflective substance I could have used. As suggested I took a photo of the front door of a house with an open door showing a shadowy interior. I positioned a sheet of A3 card as suggested, although this was not the brightest thing in the frame.
For the exercise I have used a hand held spot meter to evaluate the relative brightness (one of my favorite tools), but first started by taking an incident light reading. This gave me 1/1000s at f/4 and ISO100. I took a photo with these settings, but got a highlight clipping warning, so captured the following at 1/1500s, slightly underexposing to avoid the snow blowing out

I then walked around the scene and using the spot meter obtained the following exposures (with a constant f/4). In fact inside the house in the very darkest area the reading was 1.6s. So a very high contrast scene - in effect 13 stops.
 In Lightroom I have zoomed in on the darkest area of the image, i.e. everything inside the door frame and then increased the fill light to check what detail has been

The darkest area that is resolvable is the picture frame in the left hand side of the image above. This metered at 1/13. There is some other detail in darker areas, but it is not resolvable as anything recognizable.
Doing the Maths:
2 ^ x = (the highest resolvable shutter speed) / (the lowest resolvable shutter speed)
where x is the dynamic range, solving
x = log(high/low) / log 2 = log (8000/13) / Log(2) = 9.3
So not a bad result, the 5D2 has a dynamic range of around 9 stops. This gives me confidence that if I expose for the highlights, I will be able to pull detail from the shadows.
For the exercise I have used a hand held spot meter to evaluate the relative brightness (one of my favorite tools), but first started by taking an incident light reading. This gave me 1/1000s at f/4 and ISO100. I took a photo with these settings, but got a highlight clipping warning, so captured the following at 1/1500s, slightly underexposing to avoid the snow blowing out

I then walked around the scene and using the spot meter obtained the following exposures (with a constant f/4). In fact inside the house in the very darkest area the reading was 1.6s. So a very high contrast scene - in effect 13 stops.


The darkest area that is resolvable is the picture frame in the left hand side of the image above. This metered at 1/13. There is some other detail in darker areas, but it is not resolvable as anything recognizable.
Doing the Maths:
2 ^ x = (the highest resolvable shutter speed) / (the lowest resolvable shutter speed)
where x is the dynamic range, solving
x = log(high/low) / log 2 = log (8000/13) / Log(2) = 9.3
So not a bad result, the 5D2 has a dynamic range of around 9 stops. This gives me confidence that if I expose for the highlights, I will be able to pull detail from the shadows.
Monday, November 29, 2010
Ex. 7 Your tolerance for noise
The title of this exercise is very appropriate, noise is very much an issue of an individuals tolerance and even aesthetic viewpoint. The degree to which noise is accepted in an image must also be very dependent upon the type of image and the use to which it will be put. If I take a good quality ISO-100 image from my 5D2 and print it on glossy paper up to A3+ (the best I can do at home), I can detect no noise in the final output. If I took an image at ISO-1600 and did the same the results would probably not be acceptable. However if I made a 6x4 print from each I could probably not tell the difference. Thus an understanding of noise must be associated with the use to which an image will be used.
First off, here's my take on the science. Noise occurs for a variety of reasons, but the major two are statistical sampling errors and electronic interference. All a camera sensor does is count the number of photons of a given colour that impact upon a photo-receptor during the duration of the exposure. Electronic noise comes from adjacent receptors interfering with each other and the inherent baseline signal sampling that occurs. I am assuming that this is pretty constant, although if the sensor gets hotter in a longer exposure it will increase with the heat. When taking an image in low light there are two problems to contend with, both due to the fact that only a small number of photons are arriving at the sensor. Firstly this number may generate a signal comparable with the sensor noise and so the light is essential invisible to the camera, secondly at small numbers the statistical variance in photon incidence between sites illuminated in the same way will be relatively high. The first issue can be helped by progressive improvements in sensor design, the second is pure and simple physics and can only really be influenced by increasing the size of the sensor cell, i.e. by reducing the number of pixels for a given area. Software can help by averaging across multiple sites at low light intensity, but loss of detail is a price that must be paid.
So much for my understanding of the physics, what about my images. For this exercise I have chosen to use my EOS 5D Mark II, which has pretty good noise handling and a wide ISO range from 100 to 25,600. Other cameras would exhibit very different performance and in fact my choice of camera for a specific task is partly driven by noise handling. If I know that I will need to use an ISO greater than 400, then the only camera I use is the 5D2, my 7D works fine to ISO-400, whilst the G11 and 40D tend to be happier at ISO200 and below.
For the test I have used an indoor still life with only natural light. The subject is a flower placed against a white card, such that there are areas of light and shade on the card. This is the first photo

The colours are dull as the light was very flat. I also simply used matrix metering and did not do any correction for the fact that I was shooting a predominantly white subject, were I doing this to create a lasting image, I would have over-exposed by 1-2 stops to bring the whites back from grey. For this exercise that is not an issue. The lens is a 135mm f/2 set at f/2. This gives an exposure of 1/8s at ISO100. I then progressively increased the ISO, from 100 all the way to 25,600. I imported the images into Lightroom and imaged a portion at 100%:


 At 100% (pixel peeping) the noise starts to become obvious at around ISO 800, but is still quite acceptable. Looking at the images full screen on a 30" 2560x1600 monitor the noise only becomes a problem at around ISO 6400. Even at ISO 25600 using the noise reduction in Lightroom I was able to create a tolerable image. As mentioned earlier the missing element in this exercise is what are we going to do with the image. At 240 DPI I can print a 2 foot wide print using the 21.1MP images from this sensor. If the goal is such a print or larger then ISO 100 or 200 may be the maximum, however, for a 6"x4" print ISO 12800 will probably do rather well.
The other issue here is the pre-processing that all RAW converters do, in my case Lightroom 3 presents a much better image than the Canon software that came with the camera, however, all RAW photographs must be processed and as a result this exercise must be considered in the context of the image sensor and RAW workflow usually used by the photographer in question.
First off, here's my take on the science. Noise occurs for a variety of reasons, but the major two are statistical sampling errors and electronic interference. All a camera sensor does is count the number of photons of a given colour that impact upon a photo-receptor during the duration of the exposure. Electronic noise comes from adjacent receptors interfering with each other and the inherent baseline signal sampling that occurs. I am assuming that this is pretty constant, although if the sensor gets hotter in a longer exposure it will increase with the heat. When taking an image in low light there are two problems to contend with, both due to the fact that only a small number of photons are arriving at the sensor. Firstly this number may generate a signal comparable with the sensor noise and so the light is essential invisible to the camera, secondly at small numbers the statistical variance in photon incidence between sites illuminated in the same way will be relatively high. The first issue can be helped by progressive improvements in sensor design, the second is pure and simple physics and can only really be influenced by increasing the size of the sensor cell, i.e. by reducing the number of pixels for a given area. Software can help by averaging across multiple sites at low light intensity, but loss of detail is a price that must be paid.
So much for my understanding of the physics, what about my images. For this exercise I have chosen to use my EOS 5D Mark II, which has pretty good noise handling and a wide ISO range from 100 to 25,600. Other cameras would exhibit very different performance and in fact my choice of camera for a specific task is partly driven by noise handling. If I know that I will need to use an ISO greater than 400, then the only camera I use is the 5D2, my 7D works fine to ISO-400, whilst the G11 and 40D tend to be happier at ISO200 and below.
For the test I have used an indoor still life with only natural light. The subject is a flower placed against a white card, such that there are areas of light and shade on the card. This is the first photo

The colours are dull as the light was very flat. I also simply used matrix metering and did not do any correction for the fact that I was shooting a predominantly white subject, were I doing this to create a lasting image, I would have over-exposed by 1-2 stops to bring the whites back from grey. For this exercise that is not an issue. The lens is a 135mm f/2 set at f/2. This gives an exposure of 1/8s at ISO100. I then progressively increased the ISO, from 100 all the way to 25,600. I imported the images into Lightroom and imaged a portion at 100%:

ISO 100

ISO 200

ISO 400

ISO 800

ISO 1600

ISO 3200

ISO 6400

ISO 12800

The other issue here is the pre-processing that all RAW converters do, in my case Lightroom 3 presents a much better image than the Canon software that came with the camera, however, all RAW photographs must be processed and as a result this exercise must be considered in the context of the image sensor and RAW workflow usually used by the photographer in question.
Sunday, November 28, 2010
Ex. 6 Highlight clipping
The exercise asked for a scene with strong contrast, I selected a detail from the Hypo-Haus that contained both the grey winter sky and areas of deep shade:

Although the contrast is not great the biggest issue in retrospect is the lack of colour in the image, however, I do not think this will affect my understanding of this exercise, I already have a good feeling for the issues associated with clipping. What I have done is to take 7 images each with a 1 step difference in exposure compensation from 3 over to 3 under. In Lightroom I have turned on the highlight and shadow clipping, red is blown highlights and blue lost shadow. Otherwise I have not processed the images in any other way:


Clearly the sky blows out first at +1, by +3 parts of the building have been lost. Going the other way significant loss does not happen until -3, the camera appears to handle underexposure better than over. There is no significant banding in the images, I do not really expect there to be, given that these are 14 bit RAW images. 8 bit JPG might make this issue visible, but that is one of the primary reasons why I never use JPG for any photography. There is also no visible colour fringing in these images, I have never seen that in any RAW image.
The final point of looking at colour saturation is not really viable with these nearly monochrome images. With other cases of blown highlights, or very bright images this can be an issue in the sky. With my older 20D's offering only 12 bit colour and poorer highlight handling colour banding in blue skies has been an issue. With the newer 7D (Used here) and the 5DII I have never had that problem, at least not so far.
Going back to the RAW images, I first tried the "recover" the +3 image and was quite surprised that there was sufficient detail remaining to redefine the edge of the building and yield some contrast to the sky.
Here is the original image, 3 stops overexposed:

and the recovered version, with adjustments to Recovery, Contrast, Exposure and Blacks. I am really quite amazed at what came back, although if there was colour in this imaging the noise would be bad by now.

Overall, one impression I take from this exercise is that in the time since the work book was produced Digital cameras have improved their ability to handle blown highlights and I suspect that another two generations will see substantial improvements, even to the point at which the performance of Digital might compare to Film.
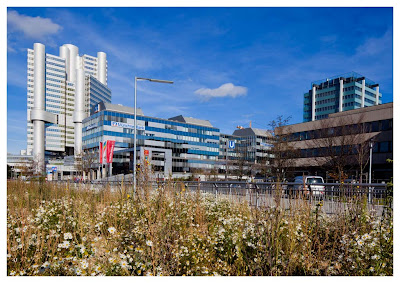
Photo Shoot: The Hypo Haus
What a name for a bank, the Hypo Haus, pronounced "Hippo House", a gift for an English Tabloid referring the fat cats of the banking world. In my case the vast profits of this this financial institution have resulted in the creation of some very photogenic architecture. Recently I went out to take some images for "Exercise 6: Highlight Clipping", and used the opportunity to take some details of this strange edifice.
The dominant feature of the bank are the supporting pillars, here I have used them to frame the picture, but allowed the street lights to interfere with what would otherwise be a very clean composition:

Moving around and going in much closer (I am using a 70-200mm zoom on an APS-C sensor) I went for a far more geometrical composition. The reflections in the glass deepen the image and add some complexity to an otherwise simple frame. I could have gone for pure symmetry, but wanted that broken by the fold in the building.

As I walked around the bank I became very aware of the many different planes within the banks geometry and the possibilities created by overlaps and reflections:

In the above image I have included the sky, however, I find the images to be far more satisfying when framing to only encompass the bank:


I am very much drawn to superimposition of natural objects against architecture:


Other than the bank, I also captured some other architectural details during my perambulation:


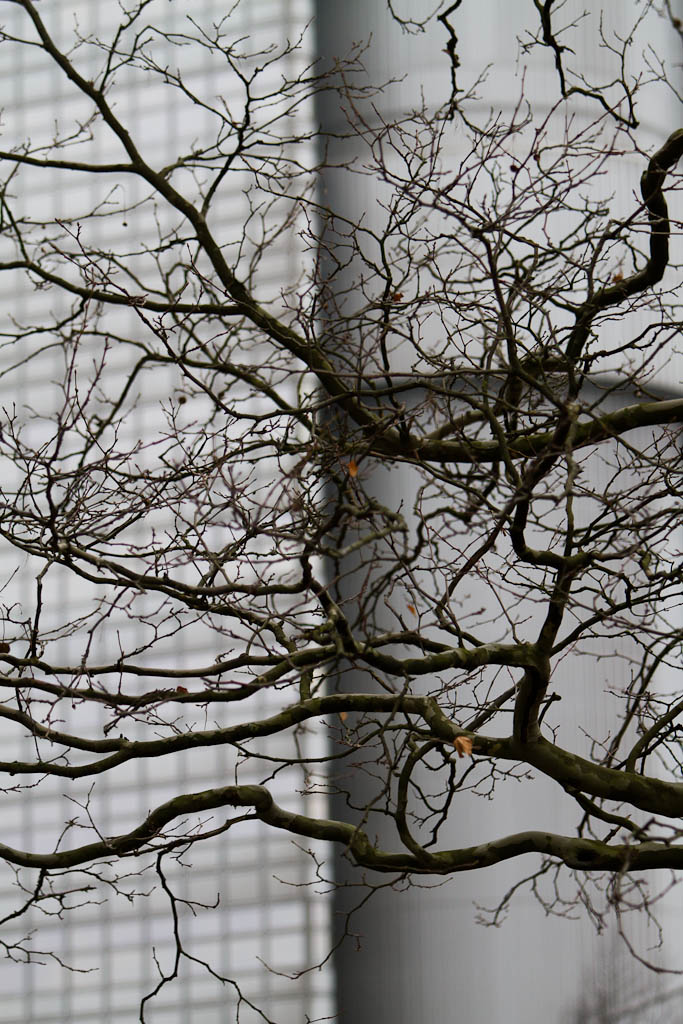
Finally I passed this tree on the way home. It seems to be bent by the wind, however, that cannot be in this area. I suspect it has had branches removed from the left side to avoid hindering the passage of vehicles down the lane. Interesting site for future work.

Looking at the imagery I am currently capturing, I think I am in a modernist phase, geometry, angles, shapes... all appeal very strongly. As I work through this course it will be interesting to see how this develops.
The dominant feature of the bank are the supporting pillars, here I have used them to frame the picture, but allowed the street lights to interfere with what would otherwise be a very clean composition:

Moving around and going in much closer (I am using a 70-200mm zoom on an APS-C sensor) I went for a far more geometrical composition. The reflections in the glass deepen the image and add some complexity to an otherwise simple frame. I could have gone for pure symmetry, but wanted that broken by the fold in the building.

As I walked around the bank I became very aware of the many different planes within the banks geometry and the possibilities created by overlaps and reflections:

In the above image I have included the sky, however, I find the images to be far more satisfying when framing to only encompass the bank:


Alternatively a simple plane presents a strong image, if a little limited

I am very much drawn to superimposition of natural objects against architecture:
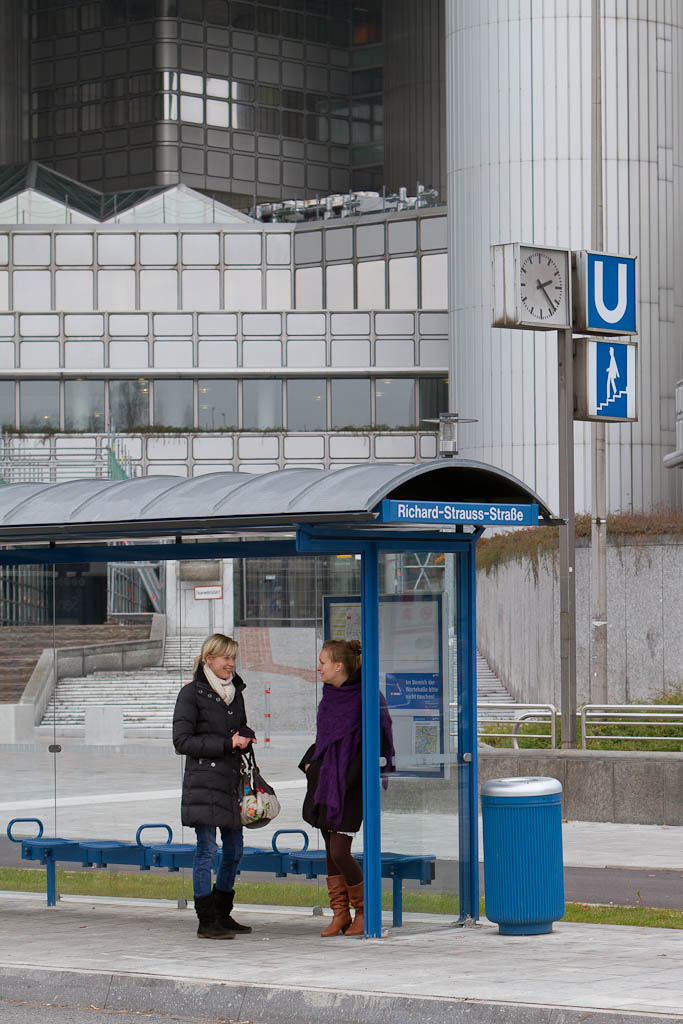
Human interaction with the architecture also interests me, this is a bus and subway stop just opposite the banks main entrance:
Other than the bank, I also captured some other architectural details during my perambulation:


Finally I passed this tree on the way home. It seems to be bent by the wind, however, that cannot be in this area. I suspect it has had branches removed from the left side to avoid hindering the passage of vehicles down the lane. Interesting site for future work.

Looking at the imagery I am currently capturing, I think I am in a modernist phase, geometry, angles, shapes... all appeal very strongly. As I work through this course it will be interesting to see how this develops.
Ex. 5 Sensor linear capture
Until recently this is not an aspect of digital photography that I have given much thought to, linear versus non-linear capture, although recently I am beginning to look critically at the difference between film and digital, so it is surfacing as an issue. First of all I appreciate the essential function of a sensor and the fact that it is simply counting the number of photons that arrive at each site and using a Bayer grid to bin these into red, green and blue values to construct an RGB value for each sensor site. The sensor is linear because it "counts" more photons equals more signal, film emulsion on the other hand "reacts" to light and that reaction occurs at different speeds for different light intensities. As the light intensifies this chemical reaction is relatively slower in proportion to the intensity and so is less prone to blowing out, i.e. it exhibits an non-liner response curve to light intensity, however, this will vary dramatically between different emulsions.
Clearly there are advantages to the non-linearity of film in very high light intensities, although the ability of "good" digital cameras to capture images in very low light conditions is the reverse benefit. The human eye is also a non-linear light capturing device, and in combination with the brain does a significant amount of image processing to make the world intelligible to us. Indeed when a blind person gains sight for the first time, they cannot see, as the brain does not know how to interpret the data it is receiving, a person has to learn to see, it is not instantaneous.
The implication of this exercise is that concern must be taken to compensate for this linearity, a process made easier by first understanding how the camera captures and uses the information.
I have started by selecting an image that I used in Assignment 1
Processing the image in Photoshop to achieve the type of curve in the exercise produces a very dark and pretty flat image - interesting though that this might be a more "real" view of the world, if we had linear eyes this is what things would look like!

Taking this image and reversing the process by applying a reverse curve, I arrived back at something similar to what I stated with. There is very little noise in the image, the starting image was noise free and the processing at 16 bit has not added much back in.

Looking at this again from a curves point of view. The histogram for the starting image is well distributed across the image

This is the curve I applied to return the image to a linear version

Looking at the new histogram it is pushed well to the left, i.e. most data is now in the darker tones

reversing this I applied the following curve

Which returned the histogram to pretty much where it started

An interesting exercise, I have always taken care to avoid blown highlights, but have not really understood why Digital cameras are more prone to this than Film. However, whilst Digital does suffer, a careful photographer can avoid this by judicious use of exposure compensation and checking to make sure that a frame has not blown immediately after taking. Bracketing can help.
Clearly there are advantages to the non-linearity of film in very high light intensities, although the ability of "good" digital cameras to capture images in very low light conditions is the reverse benefit. The human eye is also a non-linear light capturing device, and in combination with the brain does a significant amount of image processing to make the world intelligible to us. Indeed when a blind person gains sight for the first time, they cannot see, as the brain does not know how to interpret the data it is receiving, a person has to learn to see, it is not instantaneous.
The implication of this exercise is that concern must be taken to compensate for this linearity, a process made easier by first understanding how the camera captures and uses the information.
I have started by selecting an image that I used in Assignment 1

Processing the image in Photoshop to achieve the type of curve in the exercise produces a very dark and pretty flat image - interesting though that this might be a more "real" view of the world, if we had linear eyes this is what things would look like!

Taking this image and reversing the process by applying a reverse curve, I arrived back at something similar to what I stated with. There is very little noise in the image, the starting image was noise free and the processing at 16 bit has not added much back in.

Looking at this again from a curves point of view. The histogram for the starting image is well distributed across the image

This is the curve I applied to return the image to a linear version

Looking at the new histogram it is pushed well to the left, i.e. most data is now in the darker tones

reversing this I applied the following curve

Which returned the histogram to pretty much where it started

An interesting exercise, I have always taken care to avoid blown highlights, but have not really understood why Digital cameras are more prone to this than Film. However, whilst Digital does suffer, a careful photographer can avoid this by judicious use of exposure compensation and checking to make sure that a frame has not blown immediately after taking. Bracketing can help.
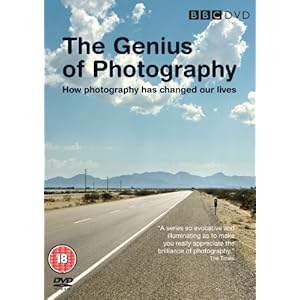
Watching
Moving from the printed page to the moving image I just finished watching "The Genius of Photography", the BBC's 6 part history of photography. Once again the historical treatment is very much one of considering photography as an art form and how the way that we think about and create art photography has evolved. At the core is the question of what is photographic art. It covers the usual suspects, the Parisians, the FSA, the New Topologists, and onto the Digital generation. One aspect of the TV series versus many of the books I have read is that it gives a voice to the photographers and provides me with a chance to put a face to a name. of particular interest were the interviews with Robert Adams and Andreas Gursky. I watched this during a couple of very dreary days when suffering from a nasty virus, in the midst of reading the accompanying book.
The Print: Watching all 6 episodes in a single day left a distinct impression of a particular aspect of photography and one that is starting to dwell in my mind. This is the question of the uniqueness of a photographic print as an object. Throughout the series and also in many written accounts, the detail of the final print, how it is made, with what materials, by whom is a key issue. I have found it surprising that in history books, details are provided of the printing method and yet little of the camera used or the exposure chosen. Currently I think about photography in terms of capture, giving very little thought to how the final object, the print, is produced and presented.
In the art market, much is made of the "Print", if it is made by the photographer, that adds value. However, surely it is the negative that is the "Original", not the print. I can understand that different processes and decisions made during printing have a significant effect on what is the final output, however, the negative is the unique vision of the photographer as an artist. This view is clearly a problem in my own practice of digital photography, what is a negative, where is the uniqueness of any image. A RAW file is not even equivalent to a negative, it is more analogous to an exposed sheet of film prior to development. Where can uniqueness enter into this environment, the RAW file can be copied, it can be "processed" in an infinite variety of ways!
Perhaps in the digital age, the print is even more significant as an expression of the art of the photographer. Clearly it has the same uniqueness issues as an analog print, but at this point those issues coincide and apart from materials are essentially the same. Many prints can be made, sure, however, only those that the artist makes and signs as original visions of their art can be seen as the "Object".
Currently I print almost all of my work onto simple HP Advanced Photo Paper, usually using a gloss finish. I am now rethinking this approach, for the reasons stated above. The choice of paper, its texture, size, the processes I use during printing, all of these add some degree of uniqueness to what is the final product. I am wary of producing "Arty" stuff, but am starting to understand that even digital art has to produce an "Object". In the past I have experimented with printing on watercolour paper, particularly for still life images of flowers. I did not use any special "inkjet" paper, just regular textured paper bought from an art store. It is time to start to experiment with the final output stage of photography, I need to start to think of my photographs as art not images.
Subscribe to:
Posts (Atom)